
Your cart is currently empty!
Free Crochet Beanie Pattern | The Duck Hill Beanie
Posted by:
|
On:
|
Hey Friend!
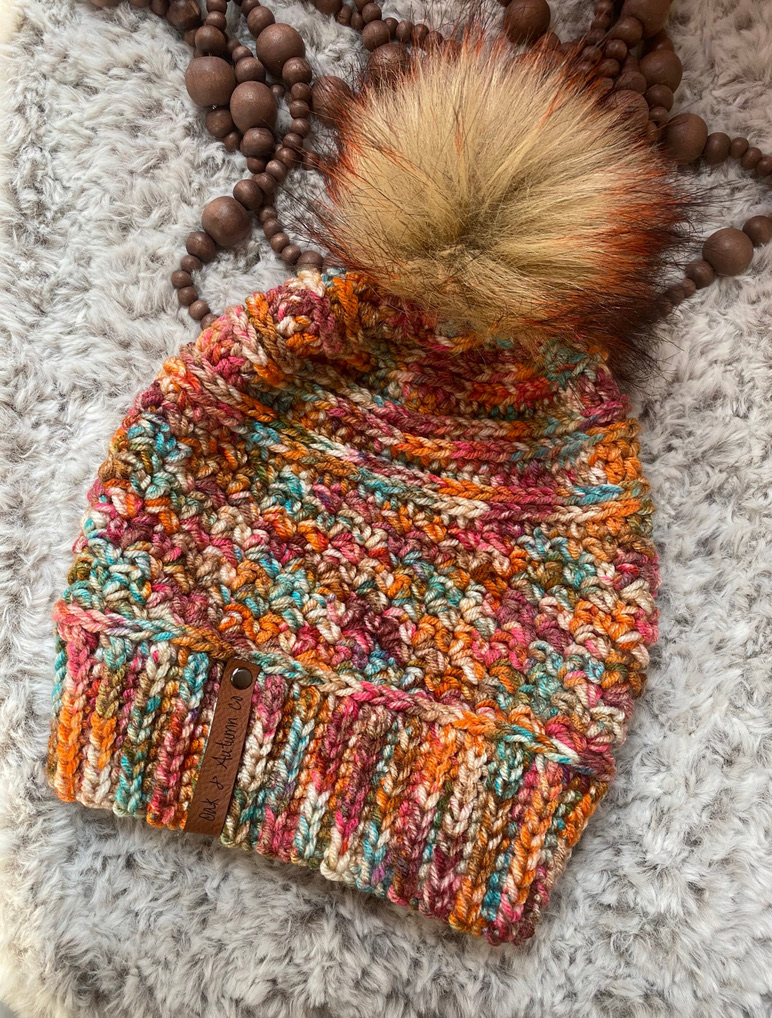
I’m so happy to be back this week. I took last Friday to focus no the market I had Friday evening so I last week and all day Friday I was dedicating my time to that. But this week I have something super special for you. I have one of my best selling patterns for you! Every year I completely sell out of all the prepped beanies I made during the summer months once September hits. This beanie is full of gorgeous texture and honestly this color choice is still my most popular, I’ve sold over 200 beanies just in this color alone. While I named this beanie the duck hill beanie, it is sometimes referred to by the orange burst beanie when I talk about it. Same thing.
Orange burst is the top color choice every year so it just kind of stuck. I also love the coordinating pom, which I would like to add that I actually wrote this pattern and picked the yarn based solely on this pompom. And it’s been a beautiful journey. I will link the pompoms below and you can find this stunning color at Hobby Lobby.
If you love this pattern, there is an inexpensive pdf in my Etsy shop. The digital file is super nice to have when you are traveling, or going to be crocheting on the run so you can take it with you and access it across all your devices.
Okay, let’s dive into it!

MATERIALS;
1 skein I love this yarn orange burst
H hook, and I hook.
Scissors
Yarn needle
Pompom, and tag (optional)
ABBREVIATIONS;
CH – chain
HDSLST – half double slip stitch
ST – stitch
HDC – half double crochet
SC – single crochet
DC – double crochet
HDC DEC – half double crochet decrease
PATTERN NOTES;
This is an intermediate level pattern.
This beanie is worked from the bottom up so you will be starting with the brim and working
your way up to the crown.
You will always ch 1 and join to the first st. Your first stitch of the round will always be
placed in the same stitch as the join. The amount of rows of your brim should be the same
as the amount of stitches in your body.
During body rounds 3-11 (or 3-9 for child and 3-8 for toddler) you will always be working in
the sc sts from the previous rounds. There will be directions to skip a st in round 2, but after
that you will always be skipping the DC sts.
There are four decrease rounds. You will Hdc in the first stitch, then HDC two sts together.
over the next two stitches, and repeat this around for all of the decrease rounds. (feel free to
implement your own decreasing methods here if you have ones you like better.)
***** if you have to add or decrease rounds that don’t use the stitch count provided, you
must have an even number. *****
SIZING NOTES –
Womens should fit teens and women. Child should comfortably fit 4-9 year olds and toddler
size should fit 1-3 year olds.
Remember to use your H Hook for the Brim, and the I Hook for the body, both are labeled
accordingly. If you crochet tight, consider going up a hook size, or add 4 brim rows, and to
your st count for the size. If you crochet rather loose, consider going down a hook size or
you can subtract 4 sts from your brim rows, and st count.
WOMEN’S
BRIM – h hook
Ch 11
Row 1 – HDSLST in the second ch from hook, and in each ch across. (10 sts)
Row 2 -62 – HDSLST in each stitch across.
Bring your short ends together and use a slip stitch to join them. Turn your band so that the
seam is on the inside.
BODY – I hook
Ch 1.
Round 1 – HDC evenly around. (62 sts)
Round 2 – (working in the 3rd loop) place a SC, and DC in the first st, sk a st. (SC,DC) in the
next st. repeat around. Join and Ch 1.
Round 3 – place a DC and a SC in the same st as join (first SC). Sk the DC st, (DC,SC) in
the next st. repeat around. Join to the top of the DC. Ch 1.
Round 4 – sk the first st (the DC) place a SC and DC into the second st (the SC from the
previous round). Sk the DC, (SC,DC) in the next SC st. repeat around.
Round 5 – place a DC, and a SC in the same st as join (first SC). Sk the DC st, (DC,SC) in
the next st. repeat around. Join to the top of the DC. Ch 1.
Round 6 – sk the first st (the DC) place a SC and DC into the second st (the SC from the
previous round). Sk the DC, (SC,DC) in the next SC st. repeat around.
Round 7 – place a DC, and a SC in the same st as join (first SC). Sk the DC st, (DC,SC) in
the next st. repeat around. Join to the top of the DC. Ch 1.
Round 8 – sk the first st (the DC) place a SC and DC into the second st (the SC from the
previous round). Sk the DC, (SC,DC) in the next SC st. repeat around..
Round 9 – place a DC, and a SC in the same st as join (first SC). Sk the DC st, (DC,SC) in
the next st. repeat around. Join to the top of the DC. Ch 1.Round 10 – sk the first st (the DC) place a SC and DC into the second st (the SC from the
previous round). Sk the DC, (SC,DC) in the next SC st. repeat around.
Round 11 – place a DC, and a SC in the same st as join (first SC). Sk the DC st, (DC,SC) in
the next st. repeat around. Join to the top of the DC. Ch 1.
Round 12 – HDC in each st around.
Round 13 – (working in the 3rd loop) HDC in each st around.
Round 14 – (working in the 3rd loop) HDC in each st around.
Round 15 – HDC in each st around.
Round 16 – (working in the 3rd loop) HDC in each st around.
Round 17 – (working in the 3rd loop) HDC in each st around.
Round 18 – HDC, HDC, HDC DEC around.
Round 19 – (working in the 3rd loop) HDC, HDC DEC in each st around.
Round 20 – (working in the 3rd loop) HDC in the first st, HDC DEC. repeat around.
Round 21 – HDC in the first st, HDC DEC. repeat around.
Fasten off, leave about a 10 inch tail to cinch the top of the beanie shut with a running stitch,
and weave in all your tails. Attach a pompom and tag if desired.
CHILD
BRIM – h hook
Ch 10
Row 1 – HDSLST in the second ch from hook, and in each ch across. (9 sts)
Row 2 -58 – HDSLST in each stitch across.
Bring your short ends together and use a slip stitch to join them. Turn your band so that the
seam is on the inside.
BODY – I hook
Ch 1.
Round 1 – HDC evenly around. (58 sts)
Round 2 – (working in the 3rd loop) place a SC, and DC in the first st, sk a st. (SC,DC) in the
next st. repeat around. Join and Ch 1.
Round 3 – place a DC, and a SC in the same st as join (first SC). Sk the DC st, (DC,SC) in
the next st. repeat around. Join to the top of the DC. Ch 1.
Round 4 – sk the first st (the DC) place a SC and DC into the second st (the SC from the
previous round). Sk the DC, (SC,DC) in the next SC st. repeat around.
Round 5 – place a DC, and a SC in the same st as join (first SC). Sk the DC st, (DC,SC) in
the next st. repeat around. Join to the top of the DC. Ch 1.
Round 6 – sk the first st (the DC) place a SC and DC into the second st (the SC from the
previous round). Sk the DC, (SC,DC) in the next SC st. repeat around.
Round 7 – place a DC, and a SC in the same st as join (first SC). Sk the DC st, (DC,SC) in
the next st. repeat around. Join to the top of the DC. Ch 1.
Round 8 – sk the first st (the DC) place a SC and DC into the second st (the SC from the
previous round). Sk the DC, (SC,DC) in the next SC st. repeat around..Round 9 – place a DC, and a SC in the same st as join (first SC). Sk the DC st, (DC,SC) in
the next st. repeat around. Join to the top of the DC. Ch 1.
Round 10 – HDC in each st around.
Round 11 – (working in the 3rd loop) HDC in each st around.
Round 12 – (working in the 3rd loop) HDC in each st around.
Round 13 – HDC in each st around.
Round 14 – (working in the 3rd loop) HDC in each st around.
Round 15 – (working in the 3rd loop) HDC in each st around.
Round 16 – HDC, HDC DEC – repeat around.
Round 17 – (working in the 3rd loop) HDC, HDC DEC – repeat around.
Round 18 – (working in the 3rd loop) HDC in the first st, HDC DEC. repeat around.
Round 19 – HDC in the first st, HDC DEC. repeat around.
Fasten off, leave about a 10 inch tail to cinch the top of the beanie shut with a running stitch,
and weave in all your tails. Attach a pompom and tag if desired.
TODDLER
BRIM – h hook
Ch 9
Row 1 – HDSLST in the second ch from hook, and in each ch across. (8 sts)
Row 2 -54 – HDSLST in each stitch across.
Bring your short ends together and use a slip stitch to join them. Turn your band so that the
seam is on the inside.
BODY – I hook
Ch 1.
Round 1 – HDC evenly around. (54 sts)
Round 2 – (working in the 3rd loop) place a SC, and DC in the first st, sk a st. (SC,DC) in the
next st. repeat around. Join and Ch 1.
Round 3 – place a DC, and a SC in the same st as join (first SC). Sk the DC st, (DC,SC) in
the next st. repeat around. Join to the top of the DC. Ch 1.
Round 4 – sk the first st (the DC) place a SC and DC into the second st (the SC from the
previous round). Sk the DC, (SC,DC) in the next SC st. repeat around.
Round 5 – place a DC, and a SC in the same st as join (first SC). Sk the DC st, (DC,SC) in
the next st. repeat around. Join to the top of the DC. Ch 1.
Round 6 – sk the first st (the DC) place a SC and DC into the second st (the SC from the
previous round). Sk the DC, (SC,DC) in the next SC st. repeat around.
Round 7 – place a DC, and a SC in the same st as join (first SC). Sk the DC st, (DC,SC) in
the next st. repeat around. Join to the top of the DC. Ch 1.
Round 8 – HDC in each st around.Round 9 – (working in the 3rd loop) HDC in each st around.
Round 10 – (working in the 3rd loop) HDC in each st around.
Round 11 – HDC in each st around.
Round 12 – (working in the 3rd loop) HDC in each st around.
Round 13 – (working in the 3rd loop) HDC in each st around.
Round 14 – HDC, HDC DEC – repeat around.
Round 15 – (working in the 3rd loop) HDC in the first st, HDC DEC. repeat around.
Round 16 – (working in the 3rd loop) HDC in the first st, HDC DEC. repeat around.
Round 17 – HDC in the first st, HDC DEC. repeat around.
Fasten off, leave about a 10 inch tail to cinch the top of the beanie shut with a running stitch,
and weave in all your tails. Attach a pompom and tag if desired.
Please feel free to sell any makes, when selling online please link back to my blog. Tag me @theoakandautumncollective on FB an insta so I can see all your beautiful makes!
DISCLAIMER – this post contains affiliate links. When an item is purchased through this link I get commission at not extra cost to you.
